Mqtt e python: esempio pratico
Dopo i primi passi su Mqtt, vediamo un esempio con un’app wx.
Creiamo un frame con all’interno un semplice widget.
Usiamo per comodità una static text, in modo da poterne cambiare il background colour ed il testo contenuto.
# monitor.py
#
# A simple wx app with mqtt client example
# Send command from another client to change the widget colour.
# ON and OFF commands are accepted.
import time
import paho.mqtt.client as paho
import wx
BROKER = "test.mosquitto.org"
PORT = 1883
TOPIC = "bancaldo/test/monitor"
class MonitorPanel(wx.Panel):
def __init__(self, parent):
super(MonitorPanel, self).__init__(parent=parent)
self.text = wx.StaticText(self, size=(200, 200))
class MonitorFrame(wx.Frame):
def __init__(self, parent, title):
super(MonitorFrame, self).__init__(parent=parent, title=title)
self.client = None
self.parent = parent
self.panel = MonitorPanel(parent=self)
self.Bind(wx.EVT_CLOSE, self.on_quit)
self.panel.SetBackgroundColour(wx.WHITE)
self.SetSize((200, 200))
self.Center()
# Mqtt client on_message callback
def on_message(self, client, userdata, message):
time.sleep(1)
com = str(message.payload.decode("utf-8"))
print("[DEBUG] received message =",
str(message.payload.decode("utf-8")))
if com.upper() == "ON":
self.panel.text.SetLabel('LIGHT ON!')
self.panel.text.SetBackgroundColour(wx.GREEN)
elif com.upper() == "OFF":
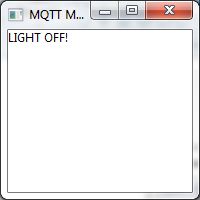
self.panel.text.SetLabel('LIGHT OFF!')
self.panel.text.SetBackgroundColour(wx.WHITE)
else:
self.panel.text.SetLabel("Unknown command:\n"
"'%s'\n Use 'ON' or 'OFF' commands only!"
% com)
self.panel.text.SetBackgroundColour(wx.RED)
def init_client(self):
self.client = paho.Client("Mqtt Monitor")
self.client.on_message = self.on_message
print("connecting %s to broker " % self.client._client_id)
self.client.connect(BROKER, PORT)
print("subscribing %s to topic '%s'..." % (self.client._client_id,
TOPIC))
self.client.subscribe(TOPIC)
self.client.loop_start()
def on_quit(self, event):
self.client.loop_stop()
self.client.disconnect()
self.Destroy()
class MQTTApp(wx.App):
def OnInit(self):
monitor = MonitorFrame(parent=None, title='MQTT Monitor')
monitor.Show()
monitor.init_client()
return True
if __name__ == '__main__':
app = MQTTApp(False)
app.MainLoop()
Ha molta importanza la callback on_message, che personalizziamo qui:
class MonitorFrame(wx.Frame):
    ...
    # Mqtt client on_message callback
    def on_message(self, client, userdata, message):
        time.sleep(1)
        com = str(message.payload.decode("utf-8"))
        print("[DEBUG] received message =",
        	  str(message.payload.decode("utf-8")))
        if com.upper() == "ON":
            self.panel.text.SetLabel('LIGHT ON!')
            self.panel.text.SetBackgroundColour(wx.GREEN)

        elif com.upper() == "OFF":
            self.panel.text.SetLabel('LIGHT OFF!')
            self.panel.text.SetBackgroundColour(wx.WHITE)
        else:
            self.panel.text.SetLabel("Unknown command:\n"
                                     "'%s'\n Use 'ON' or 'OFF' commands only!"
                                     % com)
            self.panel.text.SetBackgroundColour(wx.RED)
In pratica preleviamo il messaggio da payload e a seconda del
suo valore, coloro il widget in modo diverso.
L’assegnazione della callback, avviene durante l’inizializzazione del client mqtt,
che avviene nel metodo init_client:
class MonitorFrame(wx.Frame):
    ...
    def init_client(self):
        self.client = paho.Client("Mqtt Monitor")
        self.client.on_message = self.on_message
        print("connecting %s to broker " % self.client._client_id)
        self.client.connect(BROKER, PORT)
        print("subscribing %s to topic '%s'..." % (self.client._client_id,
        	                                       TOPIC))
        self.client.subscribe(TOPIC)
        self.client.loop_start()
    ...

class MQTTApp(wx.App):
    def OnInit(self):
        monitor = MonitorFrame(parent=None, title='MQTT Monitor')
        monitor.Show()
        monitor.init_client() # inizializzo il client mqtt
        return True


if __name__ == '__main__':
    app = MQTTApp(False)
    app.MainLoop()
Per testarne invece il funzionamento, utilizziamo l’applicazione MQTTfx,

ma andrebbe benissimo anche una shell di python, dove poter creare un client
e dare i comandi sul topic corretto:
>>> from paho.mqtt.client import Client
>>> client = Client("Mqtt Client 1")
>>> topic = "bancaldo/test/monitor"
>>> broker = "test.mosquitto.org"
>>> client.connect(broker, port=1883)
0
>>> client.publish(topic, "ON")
<paho.mqtt.client.MQTTMessageInfo object at 0x0221C750>

>>> client.publish(topic, "OFF")
<paho.mqtt.client.MQTTMessageInfo object at 0x0222A330>
>>> client.publish(topic, "FOO")
<paho.mqtt.client.MQTTMessageInfo object at 0x0221C750>

Se controlliamo la shell dove abbiamo lanciato l’app monitor.py, troveremo i messaggi di log ricevuti
grazie alla callback on_message:
(venv) C:\tmp>python monitor.py
connecting b'Mqtt Monitor' to broker
subscribing b'Mqtt Monitor' to topic 'bancaldo/test/monitor'...
[DEBUG] received message = ON
[DEBUG] received message = OFF
[DEBUG] received message = FOO


Commenti recenti