Archivio

Posts Tagged ‘redis’

Django channels: chat

15 Gennaio 2019 Commenti chiusi

Django-channels è stato creato per gestire, con django, i protocolli di comunicazione asincrona come i websockets.
Oltre alla gestione dei websockets, channels permette di eseguire processi asincroni in background.

In ogni tipica applicazione Django, il traffico HTTP è gestito in maniera Sincrona, ovvero, quando un browser manda una request,
aspetta che questa venga instradata a Django, il quale dopo le opportune elaborazioni rispedirà al mittente una response.

Invece la cosa è molto più versatile con i websockets, perchè la comunicazione è di tipo bidirezionale.
Quando una connessione ad un websocket viene stabilita, il browser può spedire e ricevere messaggi e la visualizzazione avviene automaticamente senza bisogno di “ricaricare” ogni volta il browser.

Vediamo un esempio chiarificatore.
Creiamo una chat (è il solito esempio che troverete sul web in migliaia di forme simili) con django e django-channels.

Per prima cosa creiamo un virtual-environment:

C:\tmp\django-dev>python -m venv venv

lo attiviamo:

C:\tmp\django-dev>venv\Scripts\activate

ed installiamo le librerie necessarie:

(venv) C:\tmp\django-dev>pip install django

Prima di installare channels, installiamo Twisted da wheel per non incorrere in un fastidioso errore.
Da questo sito scaricare la versione corretta, nel mio caso quella per python 3.7 a 32 bit e posizionare il file scaricato, all’interno del venv creato in precedenza. Installare il file:

(venv) C:\tmp\django-dev>pip install venv\Twisted-18.9.0-cp37-cp37m-win32.whl
Processing c:\tmp\django-dev\venv\twisted-18.9.0-cp37-cp37m-win32.whl
...
Installing collected packages: Twisted
Successfully installed Twisted-18.9.0

Installato twisted procedere con i pacchetti channels ed asgi_redis:

(venv) C:\tmp\django-dev>pip install channels channels_redis pywin32

Pywin32 è necessario per poter utilizzare Redis-server su windows.

La fase successiva è quella di creare il progetto django e l’applicazione chat:

(venv) C:\tmp\django-dev>django-admin startproject djangosite
(venv) C:\tmp\django-dev>cd djangosite
(venv) C:\tmp\django-dev\djangosite>python manage.py startapp chat

Ora andremo a modificare il codice per creare la nostra chat.
Nel file djangosite\setiings.py aggiungere channels e chat:

...

INSTALLED_APPS = [
    'django.contrib.admin',
    'django.contrib.auth',
    'django.contrib.contenttypes',
    'django.contrib.sessions',
    'django.contrib.messages',
    'django.contrib.staticfiles',
    'chat',
    'channels',
]

...

Ora puntiamo al nostro server REDIS, sempre nel file djangosite\setiings.py:

...

ASGI_APPLICATION = "djangosite.routing.application"

CHANNEL_LAYERS = {
    'default': {'BACKEND': 'channels_redis.core.RedisChannelLayer',
                'CONFIG': {"hosts": [('127.0.0.1', 6379)], }, },
                 }

Come si nota nella prima riga di codice inserita, puntiamo ad un file routing, che ora andiamo a creare:

# djangosite/routing.py

from channels.auth import AuthMiddlewareStack
from channels.routing import ProtocolTypeRouter, URLRouter
import chat.routing


application = ProtocolTypeRouter({
    # (http->django views is added by default)
    'websocket': AuthMiddlewareStack(
        URLRouter(chat.routing.websocket_urlpatterns)
    ),
}
)

Qui viene definito il ProtocolTypeRouter e si richiamano le “url” riferite ai websockets dell’applicazione chat.
Dobbiamo quindi creare anche il file routing.py dell’applicazione chat:

# chat/routing.py

from django.conf.urls import url

from . import consumers

websocket_urlpatterns = [
    url(r'^ws/chat/$', consumers.ChatConsumer),
]

Come si nota, qui importiamo e facciamo riferimento ad un Consumer (ChatConsumer).
I consumers sono l’equivalente delle views in una app tradizionale di Django.
Per approfondimenti sui Consumers fare riferimento alla doc ufficiale.

Creiamo il file consumers quindi:

# chat/consumers.py

from asgiref.sync import AsyncToSync
from channels.generic.websocket import WebsocketConsumer
import json


class ChatConsumer(WebsocketConsumer):
    @property
    def _topic_name(self):
        return "topic_DjangoWebsocketTest"

    @property
    def _chat_channel_name(self):
        return "DjangoWebsocketTest"

    def connect(self):
        AsyncToSync(self.channel_layer.group_add)(
            self._chat_channel_name,
            self.channel_name)
        self.accept()

    def disconnect(self, close_code):
        AsyncToSync(self.channel_layer.group_discard)(
            self._chat_channel_name,
            self.channel_name)

    def receive(self, text_data):

        json_text_data = '{"message": "%s"}' % text_data
        text_data_json = json.loads(json_text_data)
        message = text_data_json['message']

        AsyncToSync(self.channel_layer.group_send)(
            self._chat_channel_name,
            {
                'type': 'chat_message',
                'message': message
            })

    # Handles the "chat_message" event when it's sent to our group
    def chat_message(self, event):
        message = event['message']
        self.send(text_data=message)

Ora dobbiamo modificare i vari file urls, cominciando con quello principale:

# djangosite\urls.py

from django.contrib import admin
from django.conf.urls import include, url

urlpatterns = [
    url(r'^', include('chat.urls')),
    url(r'^admin/', admin.site.urls),
]

Poi, richiamandolo tramite include, creiamo quello specifico della app chat:

# chat\urls.py

from django.contrib import admin
from django.conf.urls import include, url
from chat import views

urlpatterns = [
    url(r'^chat$', views.chat, name='chat'),
]
Creiamo la views per effettuare la chat:

# chat/views.py

from django.shortcuts import render

# Create your views here.


def chat(request):
    return render(request, 'chat/chat.html', {})

Ed infine creiamo le templates, partendo da quella base. Creare quindi la solita directory sotto chat e
dentro quest ultima, creaiamo un’altra sottodirectory chat. Creeremo quindi due file:

chat\templates\chat\base.html
chat\templates\chat\chat.html

Il file base dal quale erediteremo sarà:

{% load staticfiles %}
{% load static %}
{# Load the tag library #}
{# Load CSS and JavaScript #}

{% block head %}
{% endblock %}

<title>{% block title %}Channels Chat{% endblock %}</title>

{% block navbar %}
{% endblock %}

<html>

  <head>
      {% block script %}{% endblock script %}
  </head>

  <body>
      {% block content %}{% endblock %}
  </body>

</html>

il file specifico invece che erediterà, sarà:

{% extends 'chat/base.html' %}

{% block title %}<title>Channels Chat</title>{% endblock %}

{% block content %}
  <html>
   <script>
    window.onload = function() {

      // Get references to elements on the page.
      var form = document.getElementById('message-form');
      var messageField = document.getElementById('message');
      var messagesList = document.getElementById('messages');
      var socketStatus = document.getElementById('status');
      var closeBtn = document.getElementById('close');
      var wsurl = "ws://127.0.0.1:8000/ws/chat/";

      // create a new socket
      var socket = new WebSocket(wsurl);

      // event listener all'apertura del socket
      socket.onopen = function open(event) {
            socketStatus.innerHTML = 'Connected to: ' + event.currentTarget.url;
            socketStatus.className = 'open';
       };

    // Send a message when the form is submitted.
    form.onsubmit = function(e) {
      e.preventDefault();

      // Retrieve the message from the textarea.
      var message = messageField.value;

      // Send the message through the WebSocket.
      socket.send(message);

      // Add the message to the messages list.
      messagesList.innerHTML += '<li class="sent"><span>Sent:</span>' + message +
                                '</li>';

      // Clear out the message field.
      messageField.value = '';

      return false;
    };

    // Handle messages sent by the server.
    socket.onmessage = function(event) {
      var message = event.data;
      messagesList.innerHTML += '<li class="received"><span>Received:</span>' +
                                 message + '</li>';
    };

    };
    </script>

   <body>
   <b><font color="green">Django Chat</font></b>
    <div id="page-wrapper">
        <h1>WebSockets with Django and Channels</h1>

        <div id="status">Connecting...</div>

        <ul id="messages"></ul>

        <form id="message-form" action="#" method="post">
          <textarea id="message" placeholder="Write your message here..." required></textarea>
          <button type="submit">Send Message</button>
          <button type="button" id="close">Close Connection</button>
        </form>
      </div>
    </body>
  </html>
{% endblock %}

Ora vediamo che tutto funzioni a dovere.
Da un altro prompt dei comandi, lanciamo il server redis con l’eseguibile redis-server:

(venv) C:\tmp\redis>redis-server.exe
...
[1780] 15 Jan 12:11:24.518 # Server started, Redis version 3.2.100
[1780] 15 Jan 12:11:24.518 * DB loaded from disk: 0.000 seconds
[1780] 15 Jan 12:11:24.518 * The server is now ready to accept connections on port 6379

e lanciamo il nostro server Django:

(venv) C:\tmp\django-dev\djangosite>python manage.py runserver
Django version 2.1.5, using settings 'djangosite.settings'
Starting ASGI/Channels version 2.1.6 development server at http://127.0.0.1:8000/
Quit the server with CTRL-BREAK.

Channels è attivo come si può notare:

Starting ASGI/Channels version 2.1.6 development server at http://127.0.0.1:8000/

Ora proviamo a raggiungere la pagina chat all’indirizzo http://127.0.0.1:8000/chat:


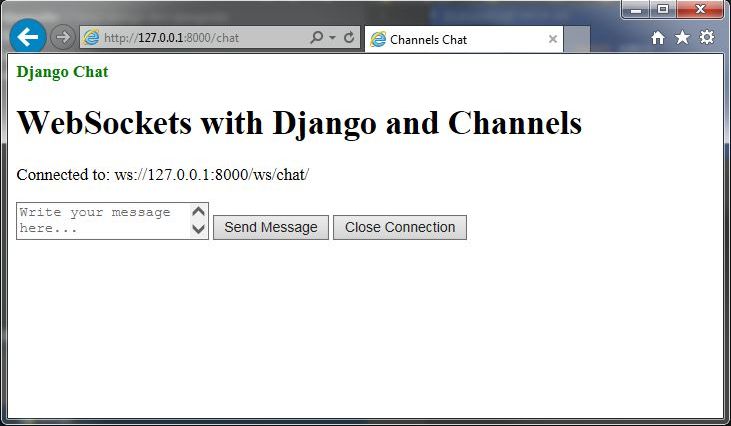
La console di django con debug attivo, mi direbbe che tutto funziona a dovere:

HTTP GET /chat 200 [0.05, 127.0.0.1:52135]
WebSocket HANDSHAKING /ws/chat/ [127.0.0.1:52139]
WebSocket CONNECT /ws/chat/ [127.0.0.1:52139]

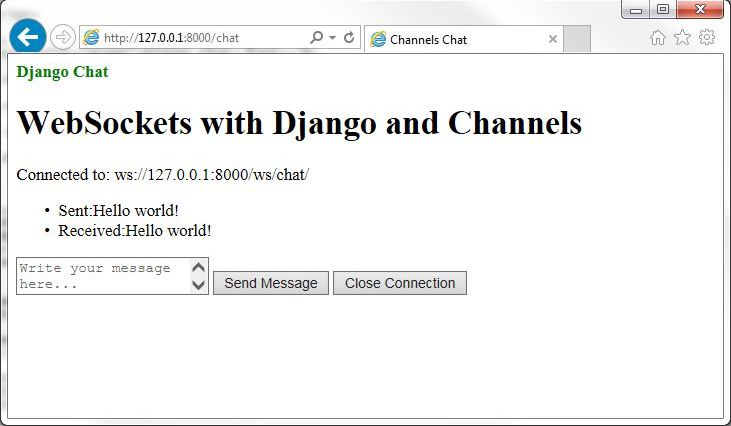
Proviamo a scrivere un messaggio, otterremmo ciò che segue.

Il messaggio che spediamo, viene anche ricevuto inquanto per come abbiamo strutturato il consumer, facendo parte del gruppo su cui scriviamo, riceviamo lo stesso messaggio spedito.


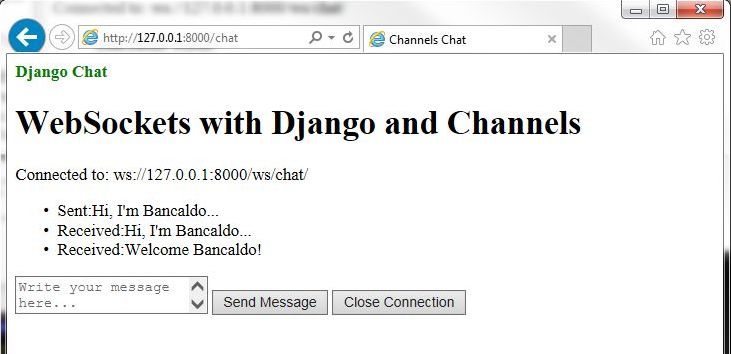
Se ora aprissimo un secondo browser e ci collegassimo allo stesso indirizzo, la chat funzionerebbe.
Spediamo pertanto un paio di messaggi da entrambi i browser e verifichiamo che tutto funzioni.
Scrivo dal Secondo client:


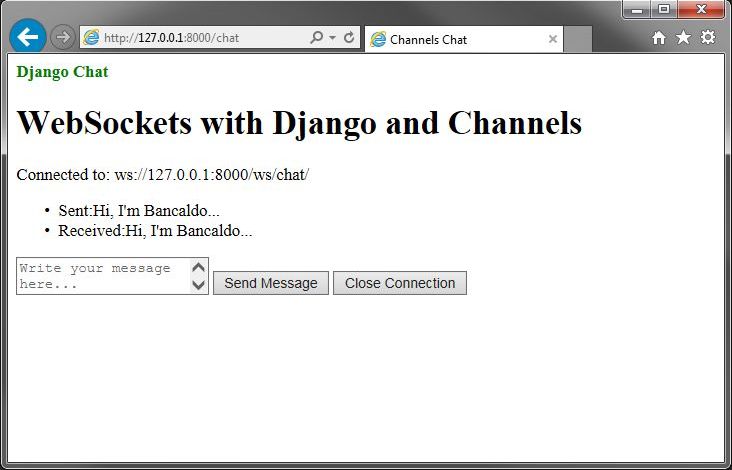
Ricevo dal Primo client:


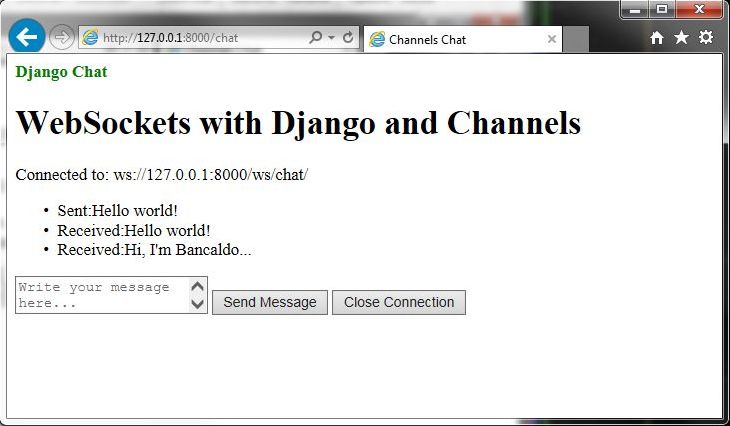
Scrivo dal Primo Client:


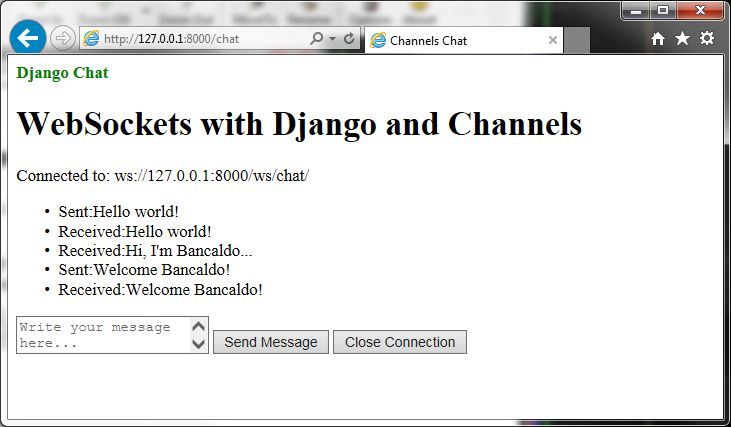
Ricevo dal Secondo Client:


Non resta che chiudere la connessione con l’apposito pulsante, disconnessione che verrà mostrata correttamente anche nella console di django:

WebSocket DISCONNECT /ws/chat/ [127.0.0.1:52200]
WebSocket DISCONNECT /ws/chat/ [127.0.0.1:52139]

Link utili:
django
django-channels
redis
example code on github

Redis: primi passi

28 Dicembre 2018 Commenti chiusi


Da wikipedia:
Redis è un key-value store open source residente in memoria con persistenza facoltativa.
Il nome Redis deriva da REmote DIctionary Server.

Alcuni punti cardine di Redis:

1. le chiavi (keys) sono stringhe che identificano parti di dati (values)
2. I valori sono gestiti da Redis come byte arrays. Redis non li gestisce, nel senso che non si effettueranno queries come si farebbe su un database tradizionale
3. Redis mette a disposizione 5 tipi di database con differenti strutture dati
4. Redis è molto veloce, mantiene tutti i dati in memoria, ma effettua una snapshot del database ogni tot secondi in funzione anche di quante chiavi sono state modificate.

Di default Redis salva il database su disco ogni 60 secondi, quando 1000 o più chiavi vengono modificate, oppure ogni 15 minuti quando al massimo 9 chiavi vengono modificate.

Gli eseguibili per windows, sono scaricabili sul sito ufficiale, o a questo indirizzo, dove è possibile trovare le versioni superiori alla 2.4.6.

Qualora si dovesse incorrere nell’errore Redis – ERR unknown command ‘EVAL’ sarà necessario installare una versione più recente del database, reperibile al secondo link.

per quel che riguarda windows, dal prompt dei comandi lanciare l’eseguibile redis-server:

C:\tmp\redis>redis-server.exe
[4696] 27 Dec 16:37:48.009 # Warning: no config file specified, using the default config. In order to specify a config file use redis-server.exe /path/to/redis.conf
                _._
           _.-``__ ''-._
      _.-``    `.  `_.  ''-._           Redis 3.2.100 (00000000/0) 64 bit
  .-`` .-```.  ```\/    _.,_ ''-._
 (    '      ,       .-`  | `,    )     Running in standalone mode
 |`-._`-...-` __...-.``-._|'` _.-'|     Port: 6379
 |    `-._   `._    /     _.-'    |     PID: 4696
  `-._    `-._  `-./  _.-'    _.-'
 |`-._`-._    `-.__.-'    _.-'_.-'|
 |    `-._`-._        _.-'_.-'    |           http://redis.io
  `-._    `-._`-.__.-'_.-'    _.-'
 |`-._`-._    `-.__.-'    _.-'_.-'|
 |    `-._`-._        _.-'_.-'    |
  `-._    `-._`-.__.-'_.-'    _.-'
      `-._    `-.__.-'    _.-'
          `-._        _.-'
              `-.__.-'

[4696] 27 Dec 16:37:48.009 # Server started, Redis version 3.2.100
[4696] 27 Dec 16:37:48.024 * DB loaded from disk: 0.016 seconds
[4696] 27 Dec 16:37:48.024 * The server is now ready to accept connections on port 6379

Come si evince, il server è in ascolto sulla porta 6379.
Da un altro prompt dei comandi possiamo lanciare l’eseguibile del client:

C:\tmp\redis>redis-cli.exe
127.0.0.1:6379>

Per vedere che tutto sia a posto, utilizziamo il comando PING e attendiamo la risposta del server

127.0.0.1:6379> ping
PONG
127.0.0.1:6379>

Vediamo i comandi base, che possono essere reperiti sul sito ufficiale.

Databases

In Redis il database è identificato da un numero. Il database di default ha indice 0.
E’ possibile cambiare database con il comando SELECT

127.0.0.1:6379> select 1
OK
127.0.0.1:6379[1]>

Abbiamo detto che Redis è un key-value store. I value associati ad una determinata chiave, vengono gestiti da Redis
come byte-array.

Associazione di valori ad una chiave

Come settare una chiave con i relativi dati associati? Con il comando SET:

127.0.0.1:6379> set users:bancaldo '{"name": "bancaldo", "email": "[email protected]"}'
OK

Ottenere i valori di una chiave

Per ottenere i valori associati ad una determinata chiave si utilizza il comando GET:

127.0.0.1:6379> get users:bancaldo
"{\"name\": \"bancaldo\", \"email\": \"[email protected]\"}"

Comandi su stringa

Alcuni comandi sulla stringa ottenuta, ad esempio lunghezza della stringa con STRLEN:

127.0.0.1:6379> STRLEN users:bancaldo
(integer) 54

Ottenere una porzione di stringa con GETRANGE:

127.0.0.1:6379> GETRANGE users:bancaldo 30 54
"\"[email protected]\"}"

Per aggiungere dati alla stringa si utilizza APPEND:

127.0.0.1:6379> APPEND users:bancaldo " foo"
(integer) 58
127.0.0.1:6379> GETRANGE users:bancaldo 30 58
"\"[email protected]\"} foo"

Operazioni su Integer

Incrementiamo un valore da riga di comando:

127.0.0.1:6379> INCR users:bancaldo:money
(integer) 1
127.0.0.1:6379> INCR users:bancaldo:money
(integer) 2
127.0.0.1:6379> INCRBY users:bancaldo:money 1000
(integer) 1002
127.0.0.1:6379> DECR users:bancaldo:money
(integer) 1001
127.0.0.1:6379> DECRBY users:bancaldo:money 500
(integer) 501

Se utilizzo però il comando INCR su una stringa, otterrò giustamente un errore:

127.0.0.1:6379> INCR users:bancaldo
(error) ERR value is not an integer or out of range

Hashes

Gli Hashes sono come le stringhe, ma ci danno la possibilità di strutturare i valori con l’utilizzon dei campi.

127.0.0.1:6379> HSET users:mauro age 25
(integer) 1
127.0.0.1:6379> HSET users:mauro money 1000000
(integer) 1
127.0.0.1:6379> HGET users:mauro age
"25"
127.0.0.1:6379> HGET users:mauro money
"1000000"
127.0.0.1:6379>

Lists

In Redis le Lists sono liste di stringhe.

Per inserire un valore in testa ad una lista si utilizza LPUSH:

127.0.0.1:6379> LPUSH inter:difesa "HANDANOVIC"
(integer) 1

Per aggiungere un elemento in fondo alla lista si utilizza invece RPUSH.

I valori possono essere anche inseriti in gruppo e entreranno nella lista a seconda dell’ordine di inserimento

127.0.0.1:6379> LPUSH inter:difesa "VRSALJKO" "DE VRIJ" "SKRINIAR" "ASAMOAH"
(integer) 5
127.0.0.1:6379> LPUSH inter:ccampo "BROZOVIC" "JOAO MARIO" "BORJA VALERO"
(integer) 3

Con il comando LRANGE posso verificare il contenuto della lista tra gli indici start e stop

127.0.0.1:6379> LRANGE inter:difesa 0 4
1) "ASAMOAH"
2) "SKRINIAR"
3) "DE VRIJ"
4) "VRSALJKO"
5) "HANDANOVIC"
127.0.0.1:6379> LRANGE inter:ccampo 0 3
1) "BORJA VALERO"
2) "JOAO MARIO"
3) "BROZOVIC"
127.0.0.1:6379>

Per ottenere un elemento della lista, via indice si utilizza LINDEX:

127.0.0.1:6379> LINDEX inter:difesa 4
"HANDANOVIC"

Altri comandi sulle liste sono:

LINSERT key BEFORE|AFTER pivot value
Inserisce un elemento PRIMA o DOPO un altro elemento nella lista

127.0.0.1:6379> LINSERT inter:attacco AFTER PERISIC ICARDI
(integer) 2
127.0.0.1:6379> LRANGE inter:attacco 0 2
1) "PERISIC"
2) "ICARDI"

LLEN key
Ottiene la lunghezza di una lista

127.0.0.1:6379> LLEN inter:attacco
(integer) 2

LPOP key
Rimuove e ritorna il primo elemento di una lista:

127.0.0.1:6379> LPOP inter:attacco
"PERISIC"
127.0.0.1:6379> LLEN inter:attacco
(integer) 1
127.0.0.1:6379> LRANGE inter:attacco 0 2
1) "ICARDI"

LREM key count value
Rimuove gli elementi che corrispondono a value

127.0.0.1:6379> LRANGE inter:ccampo 0 3
1) "BROZOVIC"
2) "BORJA VALERO"
3) "JOAO MARIO"
127.0.0.1:6379> LREM inter:ccampo 1 BROZOVIC
(integer) 1
127.0.0.1:6379> LRANGE inter:ccampo 0 3
1) "BORJA VALERO"
2) "JOAO MARIO"

Se ci fossero più occorrenze di value, basterebbere invece di 1 (count) mettere 2 o più.
Se invece di 1 (o 2) si utilizzasse un numero negativo, si invertirebbe il senso di ricerca, quindi dal basso verso l’alto.

127.0.0.1:6379> LPUSH inter:ccampo VECINO
(integer) 3
127.0.0.1:6379> LPUSH inter:ccampo "JOAO MARIO"
(integer) 4
127.0.0.1:6379> LRANGE inter:ccampo 0 4
1) "JOAO MARIO"
2) "VECINO"
3) "BORJA VALERO"
4) "JOAO MARIO"
127.0.0.1:6379> LREM inter:ccampo -1 "JOAO MARIO"
(integer) 1
127.0.0.1:6379> LRANGE inter:ccampo 0 4
1) "JOAO MARIO"
2) "VECINO"
3) "BORJA VALERO"
127.0.0.1:6379>

LSET key index value

Setta il valore di una lista in base all’indice di essa:

127.0.0.1:6379> LRANGE inter:ccampo 0 4
1) "JOAO MARIO"
2) "VECINO"
3) "BORJA VALERO"
127.0.0.1:6379> LSET inter:ccampo 2 "GAGLIARDINI"
OK
127.0.0.1:6379> LRANGE inter:ccampo 0 4
1) "JOAO MARIO"
2) "VECINO"
3) "GAGLIARDINI"

LTRIM key start stop

Modifica la lista riducendola a soli gli elementi compresi tra start e stop:

127.0.0.1:6379> LRANGE inter:ccampo 0 4
1) "JOAO MARIO"
2) "VECINO"
3) "GAGLIARDINI"
127.0.0.1:6379> LTRIM inter:ccampo 0 1
OK
127.0.0.1:6379> LRANGE inter:ccampo 0 4
1) "JOAO MARIO"
2) "VECINO"

RPOP key

Rimuove e ritorna l’ultimo elemento di una lista:

127.0.0.1:6379> RPOP inter:ccampo
"VECINO"
127.0.0.1:6379> LRANGE inter:ccampo 0 4
1) "JOAO MARIO"

RPOPLPUSH source destination

Rimuove l’ultimo elemento di una lista e lo aggiunge in un’altra, ritornandolo.

127.0.0.1:6379> LRANGE inter:ccampo 0 4
1) "JOAO MARIO"
127.0.0.1:6379> RPOPLPUSH inter:ccampo inter:panchina
"JOAO MARIO"
127.0.0.1:6379> LRANGE inter:ccampo 0 4
(empty list or set)
127.0.0.1:6379> LRANGE inter:panchina 0 4

RPUSH key value1 [value2]

Aggiunge in coda un valore alla lista. E’ l’opposto di LPUSH, che lo aggiunge invece in testa ad essa

RPUSHX key value

Aggiunge un valore ad una lista solo se questa esiste

127.0.0.1:6379> RPUSHX inter:tribuna ICARDI
(integer) 0
127.0.0.1:6379> LRANGE inter:tribuna 0 4
(empty list or set)

L’opposto inquanto a punto di inserimento in lista è LPUSHX.

Ordinamento valori

E’ possibile ordinare i valori di una lista con il comando SORT

127.0.0.1:6379> RPUSH inter:difesa:numeri 1 2 3 4 5 13 14
(integer) 7
127.0.0.1:6379> SORT inter:difesa:numeri
1) "1"
2) "2"
3) "3"
4) "4"
5) "5"
6) "13"
7) "14"

è possibile anche impostare delle priorità:

127.0.0.1:6379> SET titolari:1 1
OK
127.0.0.1:6379> SET titolari:2 2
OK
127.0.0.1:6379> SET titolari:13 3
OK
127.0.0.1:6379> SET titolari:14 4
OK
127.0.0.1:6379> SORT inter:difesa:numeri by titolari:* desc
1) "14"
2) "13"
3) "2"
4) "1"
5) "5"
6) "4"
7) "3"

PUBLISH e SUBSCRIBE

I comandi basici sono PUBLISH message e SUBSCRIBE message

Utilizziamo un altro prompt dove lanceremo un secondo client per controllare i comandi suddetti.
Da uno dei due client effettuaiamo il SUBSCRIBE ad un “canale” casuale.
Il Channel è il canale appunto dove avverranno le comunicazioni tra client. Chiameremo il canale “test”.

127.0.0.1:6379> SUBSCRIBE test
Reading messages... (press Ctrl-C to quit)
1) "subscribe"
2) "test"
3) (integer) 1

Ora, dall’altro client, Publicheremo un messaggio che dovrà essere ricevuto dal primo:

127.0.0.1:6379> PUBLISH test ON
(integer) 1
127.0.0.1:6379>

Se controlliamo il client che ha effettuato il subscribe:

127.0.0.1:6379> SUBSCRIBE test
Reading messages... (press Ctrl-C to quit)
1) "subscribe"
2) "test"
3) (integer) 1
1) "message"
2) "test"
3) "ON"

REDIS e Python

Integriamo python in tutto questo:
Dal nostro ambiente virtuale installiamo redis

(venv) C:\tmp>pip install -U redis
Collecting redis
...
Successfully installed redis-3.0.1

apriamo una shell di python e…

>>> from redis import Redis
>>> r = Redis(host="127.0.0.1", port=6379, db=0)
>>> r.publish("test", "message from python shell")
1

Se controlliamo il client precedente, in ascolto, troveremo il messaggio appena spedito:

1) "message"
2) "test"
3) "message from python shell"

Per effettuare il SUBSCRIBE ad un canale, utilizziamo il metodo pubsub, che creerà un oggetto PubSub:

>>> p = r.pubsub()
>>> p
<redis.client.PubSub object at 0x00C92630>

Ora che abbiamo l’oggetto PubSub è possibile “iscriversi” al canale desiderato:

>>> p.subscribe("test")

Ora possiamo spedire un messaggio sul canale:

>>> r.publish("test", "message 2 from python shell")
2

Per risalire ai messaggi spediti sul canale, possiamo utilizzare il metodo get_message dell’oggetto PubSub:

>>> p.get_message()
{'type': 'message', 'pattern': None, 'channel': b'test', 'data': b'message 2 from python shell'}

che restituisce un dizionario contenente i dati che ci interessano.

type: può essere uno dei seguenti valori ‘subscribe’, ‘unsubscribe’, ‘psubscribe’, ‘punsubscribe’, ‘message’, ‘pmessage’
channel: il canale sul quale siamo in ascolto o dove è stato pubblicato un messaggio
pattern: il pattern che corrisponde ad un messaggio pubblicato; sarà None eccetto in caso di ‘pmessage’.
data: il contenuto del messaggio.

Link utili:
Redis doc
libreria redis per python

Categorie:redis Tag: